Setting up a Raspberry Pi  to Prototype Tensorflow Computer Vision Applications
At Rosan International we have been recently geeking out on Tensorflow models for Raspberry Pi. For those of you with better things to do in your free time than tinkering with single-board computers, let me introduce the majesty of the Raspberry Pi: the world’s cheapest computer. Raspberry Pi is a credit card-sized computer developed by the Raspberry Pi foundation, a UK-based charity with the mission to enable young people to realise their full potential through the power of computing and digital technologies.
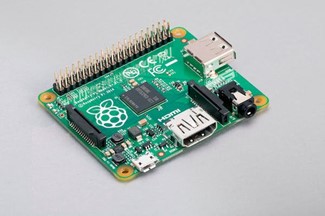
Its most basic incarnation, the Raspberry Pi Zero, packs a 1GHz single-core CPU, 512MB RAM, Mini HDMI port, Micro USB OTG port, Micro USB power, HAT-compatible 40-pin header, composite video and reset headers, and CSI camera connector, all for the princely sum of $5.00! We thought we’d go with a somewhat fancier version to make connectivity a bit easier, and landed on the A+, with a full-sized HDMI port, microSD card slot, micro USB port, and 3.5mm audio jack, and 40 GPIO pins for integration with external devices, a much more elite proposition than the zero at €37.90, shipping costs included.
To make our life easier and keep the RPi as a self-contained, independent desktop device, we invested in a few additional peripherals, including a Kingston microSD card with SDCS2/32GB Class 10 to serve as the RPi ‘hard drive’, a dedicated AptoFun 5V 2A Micro USB Charger to provide a steady power supply. Since we want to use the RPi to prototype computer vision applications, we also got a Raspberry Pi NoIR Camera Module V2 with 8 megapixels. We finally wanted to provide some protection to the delicate single board and a fan to cool down the processor, so we got a eleUniverse Case for Raspberry Pi 3A+. All in all that set us back less than 100 euros!
| Raspberry Pi 3 A+ | € 37.90 |
| SD card | € 4.59 |
| Charger | € 10.00 |
| Camera | € 32.90 |
| Case and fan | € 14.48 |
| Total | € 99.87 |
Setting up an RPi for desktop use takes a bit of extra homework though. Luckily, the whole process is very thoroughly documented in the Getting started guide. We summarize it here for you.
Step 1: Installing Raspberry OS on SD Card
To begin, you’ll need to install the Raspberry OS onto your SD card. To do this, you can use the OS imager tool, which simplifies the process and ensures a smooth installation. We went with the ‘Buster’ version of the OS, as we want to prototype Tensorflow applications that were developed under that version.
Step 2: Connecting Peripherals
Once you have the OS installed, it’s time to connect your Raspberry Pi to the necessary peripherals. Connect your monitor, USB keyboard/mouse, camera, and power supply to the appropriate ports on the Raspberry Pi board. The trickiest one is the camera, but not that hard really.
Step 3: Powering Up
With everything connected, it’s time to power up your Raspberry Pi by plugging in the power supply. Sit back and let the magic happen as your Raspberry Pi boots up and you land on the temple of RPi.

Step 4: Enabling the Camera
Next you’ll need to enable the camera. Go to the main menu and open the RPi Configuration tool. Select the Interfaces tab and ensure that the camera is enabled, and finally reboot your Raspberry Pi.
Connecting to iPad/iPhone: One additional nifty trick is to use the RPi as a remote unit, which you can control from a more user-friendly device such as a tablet.
Step 1: Enabling SSH
To establish a connection between your Raspberry Pi and iPad/iPhone, you’ll first need to enable SSH (Secure Shell) on your Raspberry Pi. This allows for secure remote access to your Raspberry Pi’s command line interface. Enable SSH.
Step 2: Finding Raspberry Pi IP Address
To connect your iPad/iPhone to your Raspberry Pi, you’ll need to know the IP address of your Raspberry Pi. To find it, open the command prompt and enter the following command to display the IP address of your Raspberry Pi:
hostname -I
Step 3: Installing PiHelper and Adding New Connection
On your iPad or iPhone, install the PiHelper app from the App Store. Once installed, open the app and add new connection using the IP address you obtained in the previous step.
Step 4: Installing TightVNC on Raspberry Pi
To enable remote desktop access, you’ll need to install TightVNC on your Raspberry Pi. Open the command prompt and enter the command: `$ sudo apt install tightvncserver` to install it.
Step 5: Setting Up Password
After installing TightVNC, set up a password by entering the command `$ tightvncserver`. Follow the prompts to create a secure password for remote access.
Step 6: Installing “VNC Viewer – Remote Desktop” on iPad/iPhone
To connect to your Raspberry Pi from your iPad or iPhone, install the “VNC Viewer – Remote Desktop” app from the App Store here. This app will allow you to access the Raspberry Pi’s graphical desktop remotely.
Run Tensorflow Models: Finally we want to clone a few tensorflow examples and check that everything works as expected.
Step 1: Install tflite-runtime
To begin, open the Raspberry Pi Command Prompt and execute the following command to install the tflite-runtime package:
python3 -m pip install tflite-runtime
Step 2: Download the Example Files
Next, clone the TensorFlow examples repository by running the following command:
git clone https://github.com/tensorflow/examples --depth 1
Step 3: Modify requirements.txt
Navigate to the “examples/lite/examples/image_classification/raspberry_pi” folder and open the “requirements.txt” file. Modify its contents as follows:
 argparse

numpy==1.20.0  # To ensure compatibility with OpenCV on Raspberry Pi.

opencv-python==4.5.5.62

tflite-runtime>=2.7.0
Step 4: Install libatlas
Return to the command prompt and execute the following command to install the libatlas library:
sudo apt-get install libatlas-base-dev
Step 5: Install Python Packages
Navigate to the “examples/lite/examples/image_classification/raspberry_pi” folder using the command prompt and run the setup script using the following commands:
cd examples/lite/examples/image_classification/raspberry_pi

sh setup.sh
You should be ready to go!

OK, pretty awesome, right? Yes indeed! Regrets? I have a few. Too few not to mention! Just two, really.
Regret 1: The A+ only has one USB port. You can do most everything with it and a wireless keyboard+mouse, but there were a few instances where I missed an extra USB port. For example, I could have used one of my USB webcams instead of having to buy the RPi cam, which is almost as expensive as the single board! Also the A+ has very limited RAM, making it almost impossible to browse the internet, for example. The next model up, the RPI B, is a significant step above in terms of connectivity, processing and RAM. To be fair, also price. While the Raspberry Pi web says that you can find this “from $35”, it’s hard to find anything out there for less than $50.

Regret 2: eleUniverse Case for Raspberry Pi 3A+. Its cheap and it works. So what’s not to love?

Let’s say it does not look great with a camera on it! While the case has a slot to pass the camera ribbon, the whole thing dangles out there rather ungraciously. There aren’t really a lot of great cases for the A+ though. So, hey, nothing a bit of tape can’t solve!

OK, so we are all set to start prototyping our custom computer vision models on an RPi. Hope you found it useful and stay tuned for future updates!
About Rosan International
ROSAN is a technology company specialized in the development of Data Science and Artificial Intelligence solutions with the aim of solving the most challenging global projects. Contact us to discover how we can help you gain valuable insights from your data and optimize your processes.