
Previously, on this blog, we went over the steps required to containerize a Jupyter notebook to increase its reproducibility and shareability. One additional benefit is that now you are just one step away from running containers on the cloud. At Rosan we sometimes run big machine learning jobs requiring significant amounts of RAM and compute. These jobs are usually too big for a local machine, so cloud-based alternatives are a must for us. Here’s one way to do it… wanna go for a run?
Pre-requisites
Running containers on the cloud is easier done if you have a few pieces of local software. If you haven’t already, download and install Docker Desktop from the official Docker website:
Additionally, you will need the Google Cloud SDK, i.e. gcloud, to build and push your local container to Google Cloud. The gcloud CLI is a set of command-line tools that allows you to interact with Google Cloud Platform (GCP) services and resources from your local terminal:
Create a Service Account
While ChatGPT may instruct you at first to authenticate using gcloud init with your personal login details, it is better practice to create a dedicated service account. This will better adhere to the “least privilege principle” and allow you to share the service account with your team. You can create a service account for the “video_augmentation” from the command line…
gcloud projects add-iam-policy-binding videoaugmenter-386516 –member=”serviceAccount: video-augmentation@videoaugmenter-386516.iam.gserviceaccount.com” –role=”roles/storage.admin”
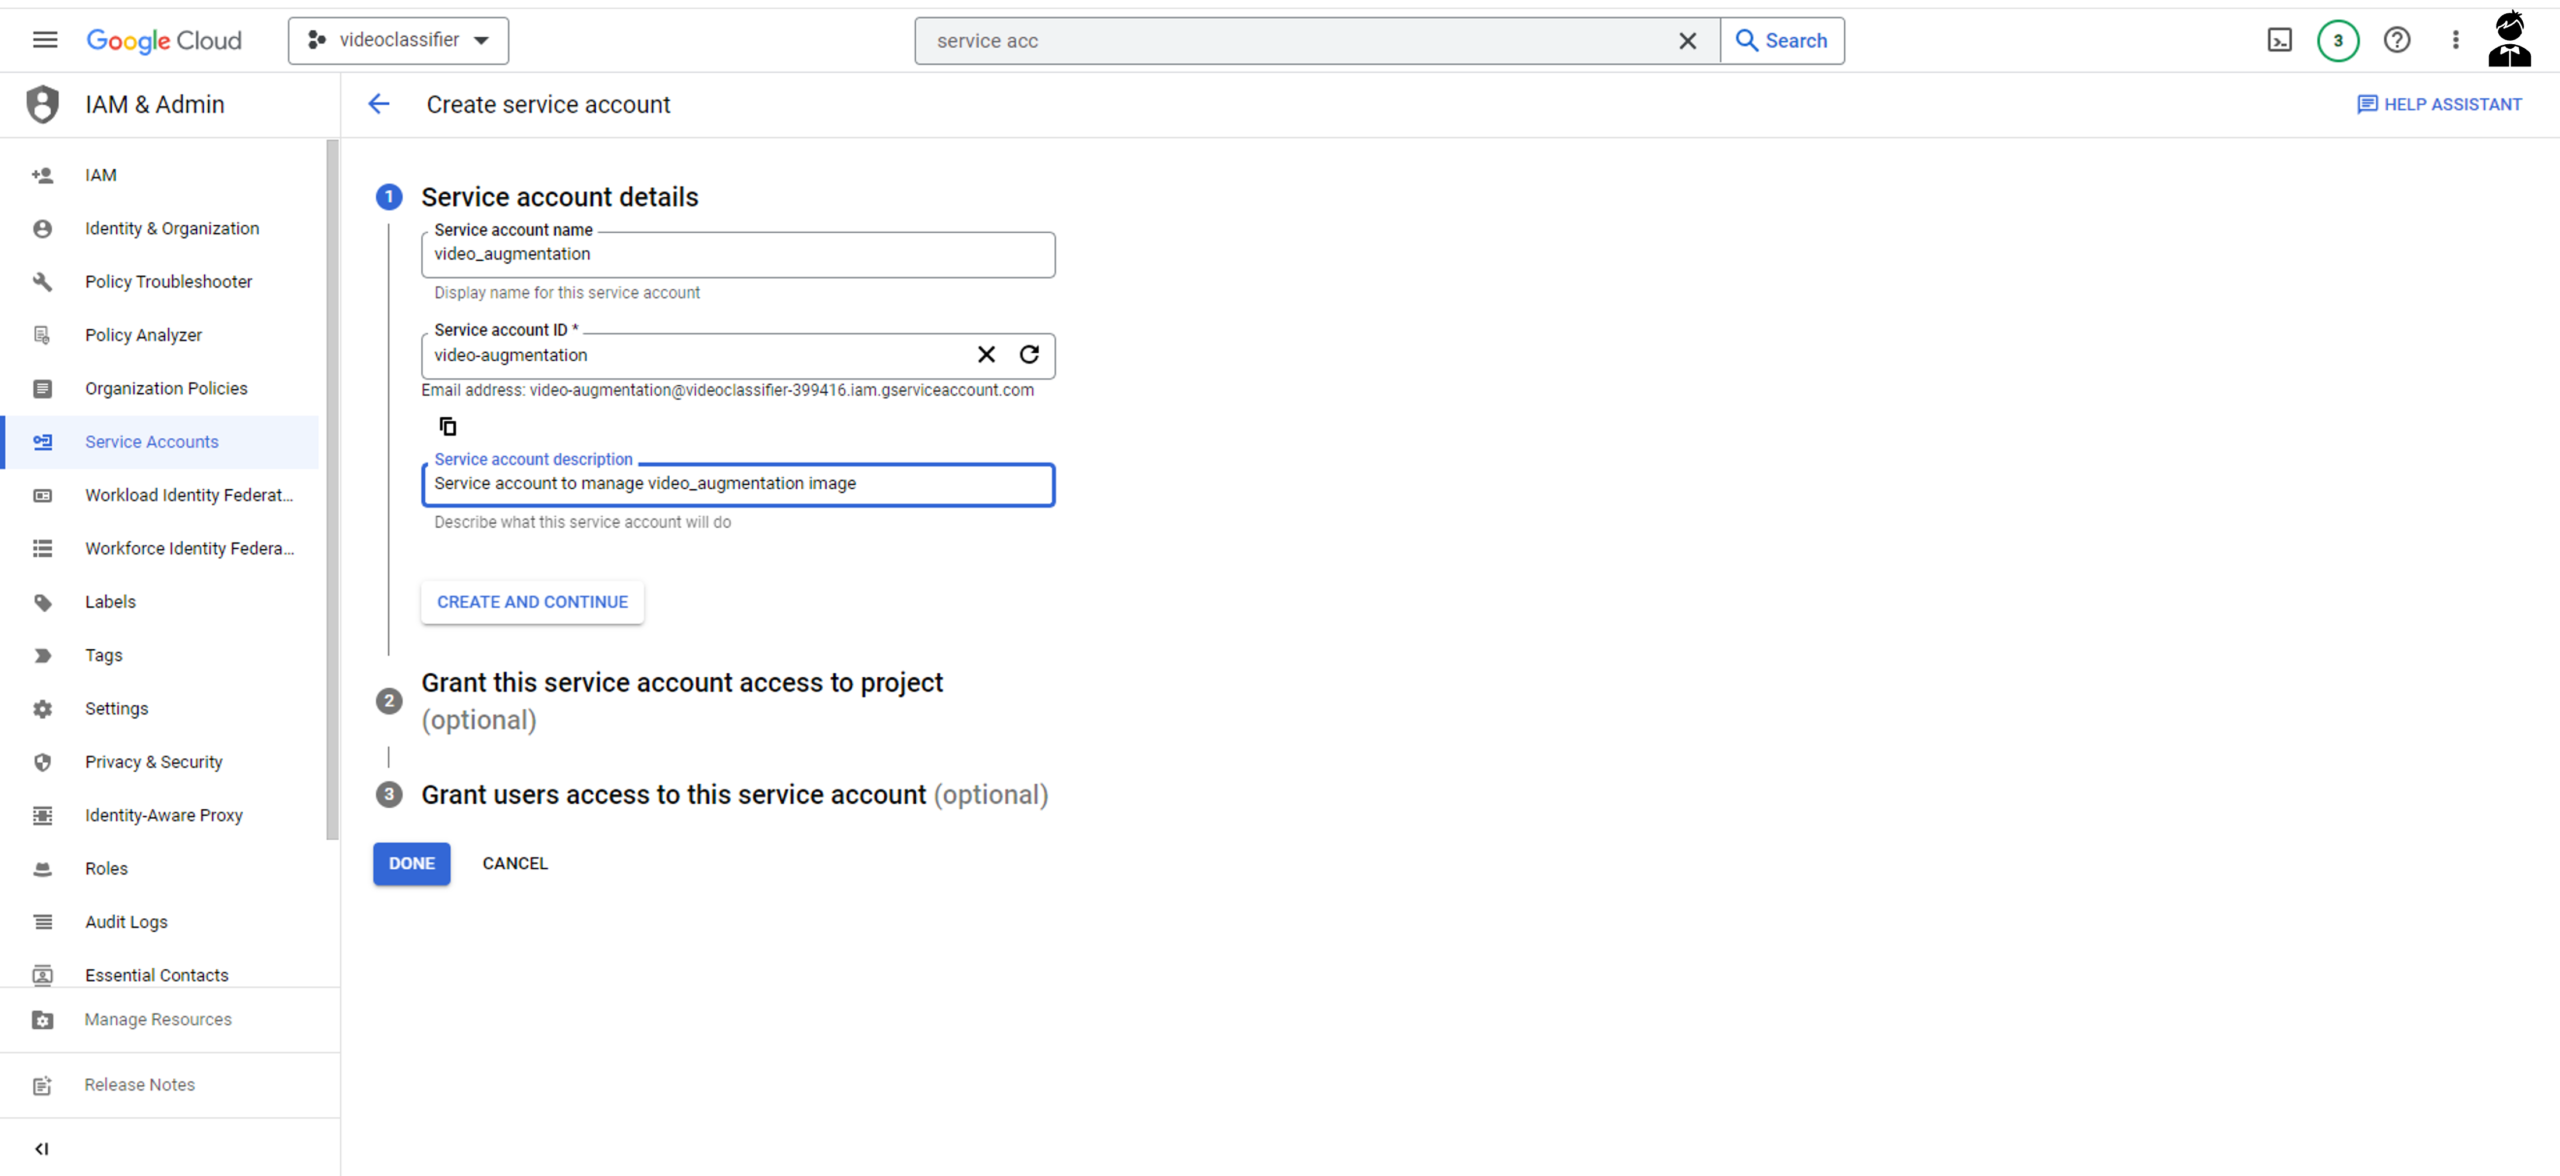
…or from the Google Cloud console > IAM & Admin > Service Accounts.
- Enter a “Service account name”, e.g. “video_augmentation”
- Copy auto-generated email address: video-augmentation@videoaugmenter-386516.iam.gserviceaccount.com
- Click “Done”
Authenticate as the Service Account
Now you will need to log in as the service account you just created to let GCP know who is uploading the container. First you will need to create an access key for the service account, then authenticate on the terminal.
- Create access key: click on the service account you created, then Keys > Add Key > Create New Key > JSON.
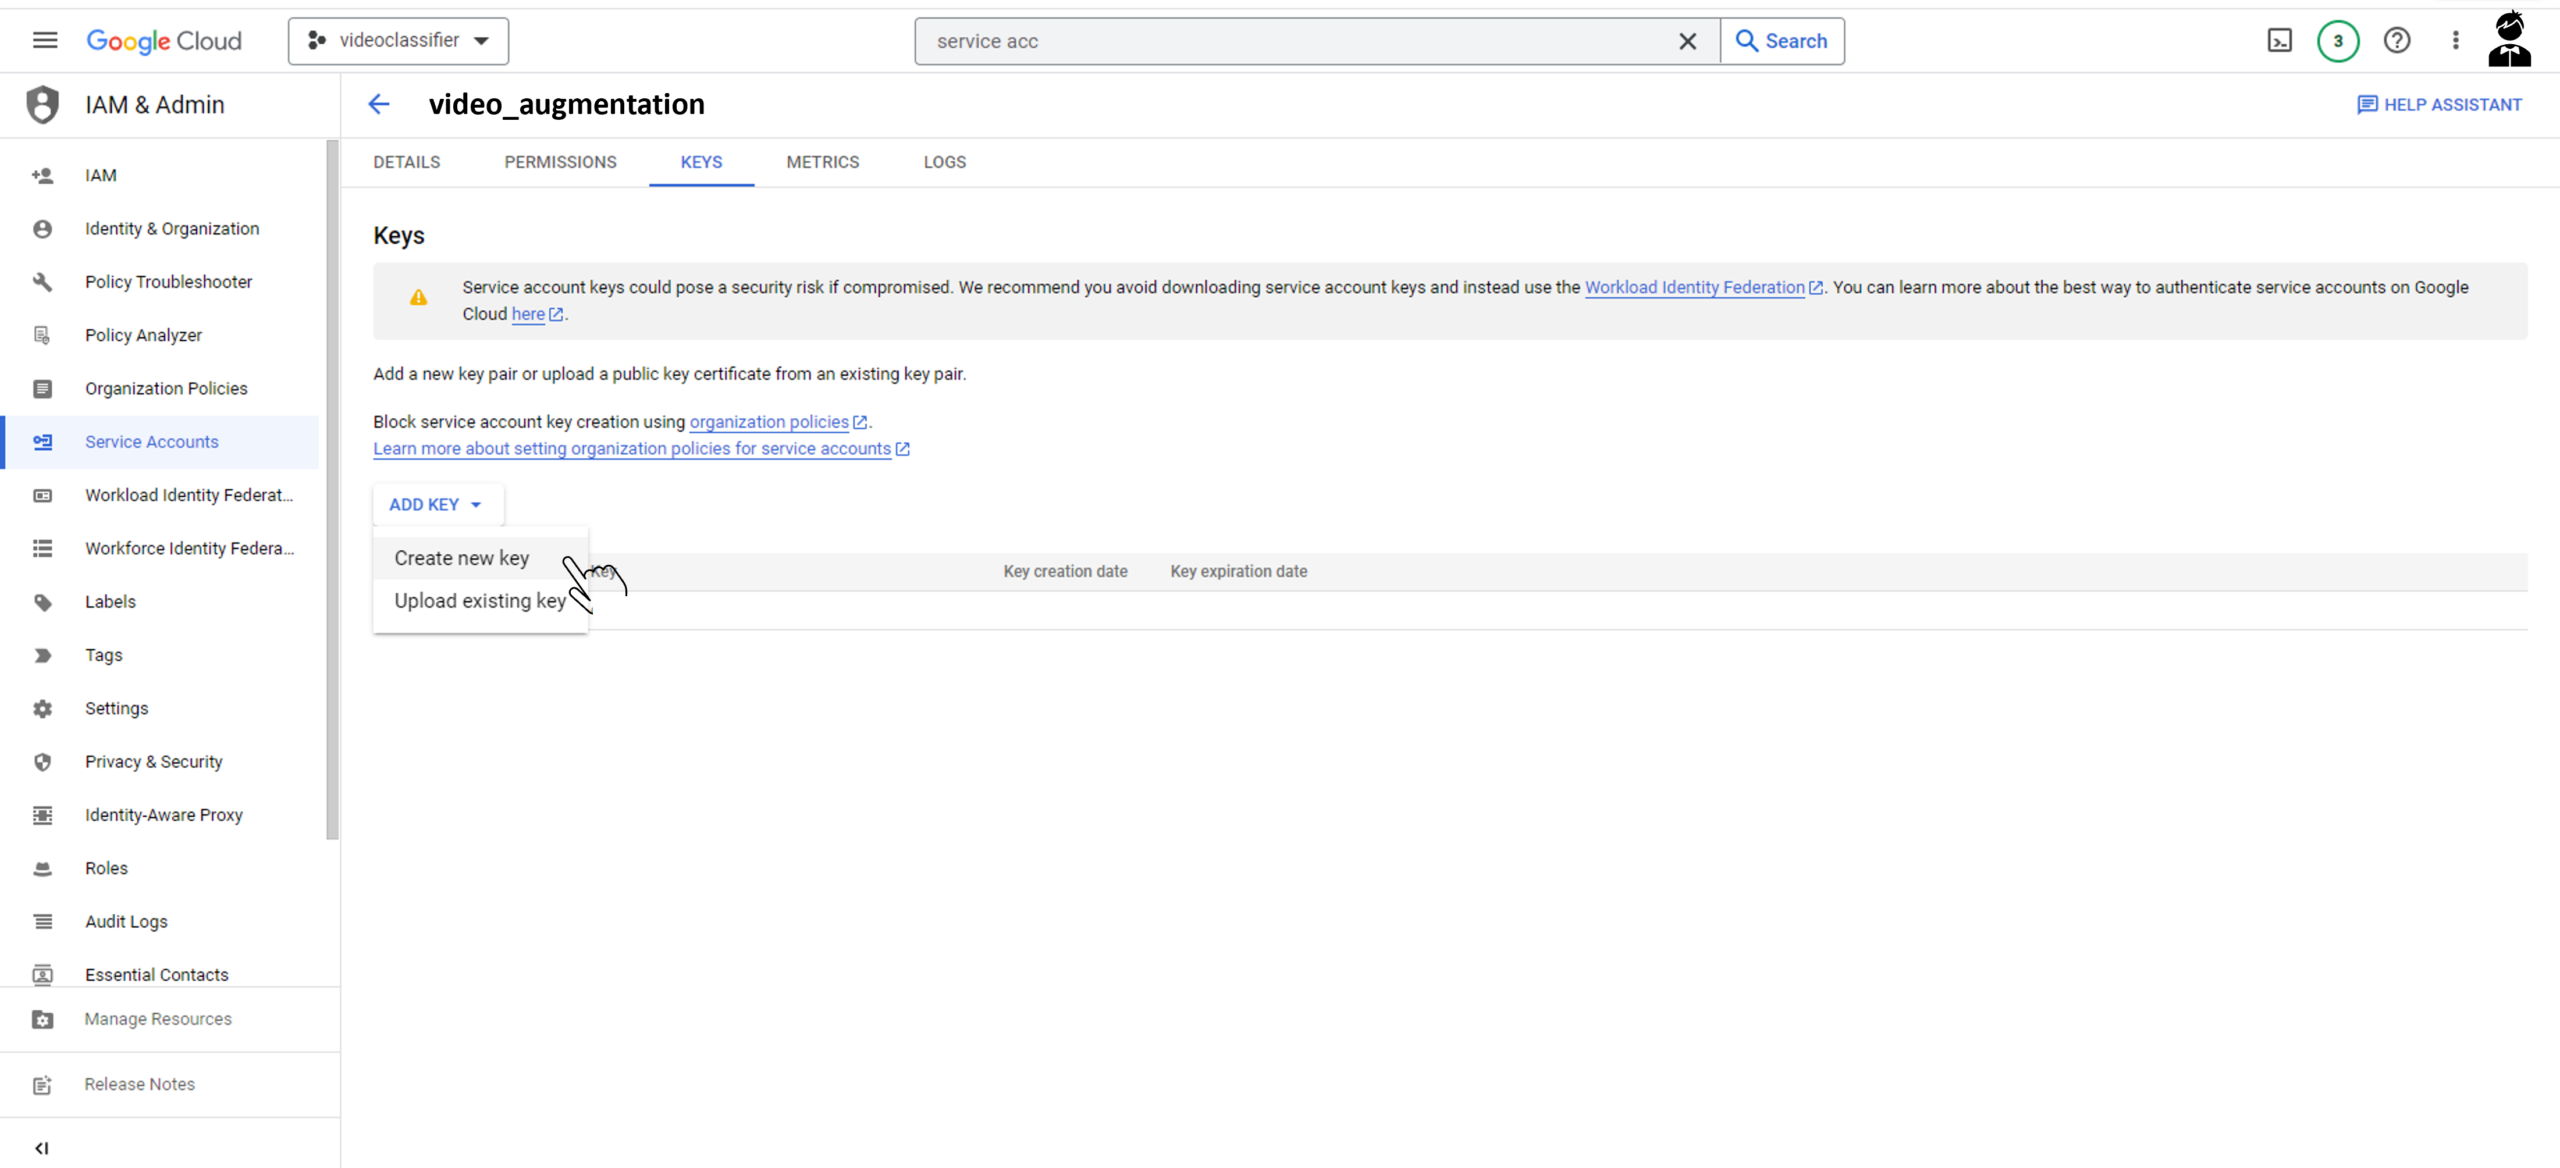
- Save access key json to local folder, let us call it “video-augmentation.json”
- Authenticate: Open a terminal at the folder where you created your container (or CD to it), and run the following gcloud command
- Finally configure Docker to authenticate with Google Cloud Container Registry (GCR) using your Google Cloud credentials. It allows you to push and pull container images to and from GCR without having to manually authenticate each time you perform a Docker operation.
Push the Local Docker Image
Now you should tag your local Docker image with the Container Registry path and push it to Google Container Registry (gcr).
docker push gcr.io/videoaugmenter-386516/video_augmentation:initial
Docker will now take some time to upload your image to gcr, depending on how big the image is.
Create Cloud Run Job
You can run your containers either as services or as jobs. A service is more typically oriented towards websites or other applications that need to be continuously up and receiving requests. A job is a one and done. In the case of the video_augmentation container, we really just want to execute it once and see the output, so let’s run it as a job. You can do this from the terminal, but we go the console route here:
- Go to Cloud Run > Create Job > Container image URL > SELECT > CONTAINER REGISTRY and click on your container
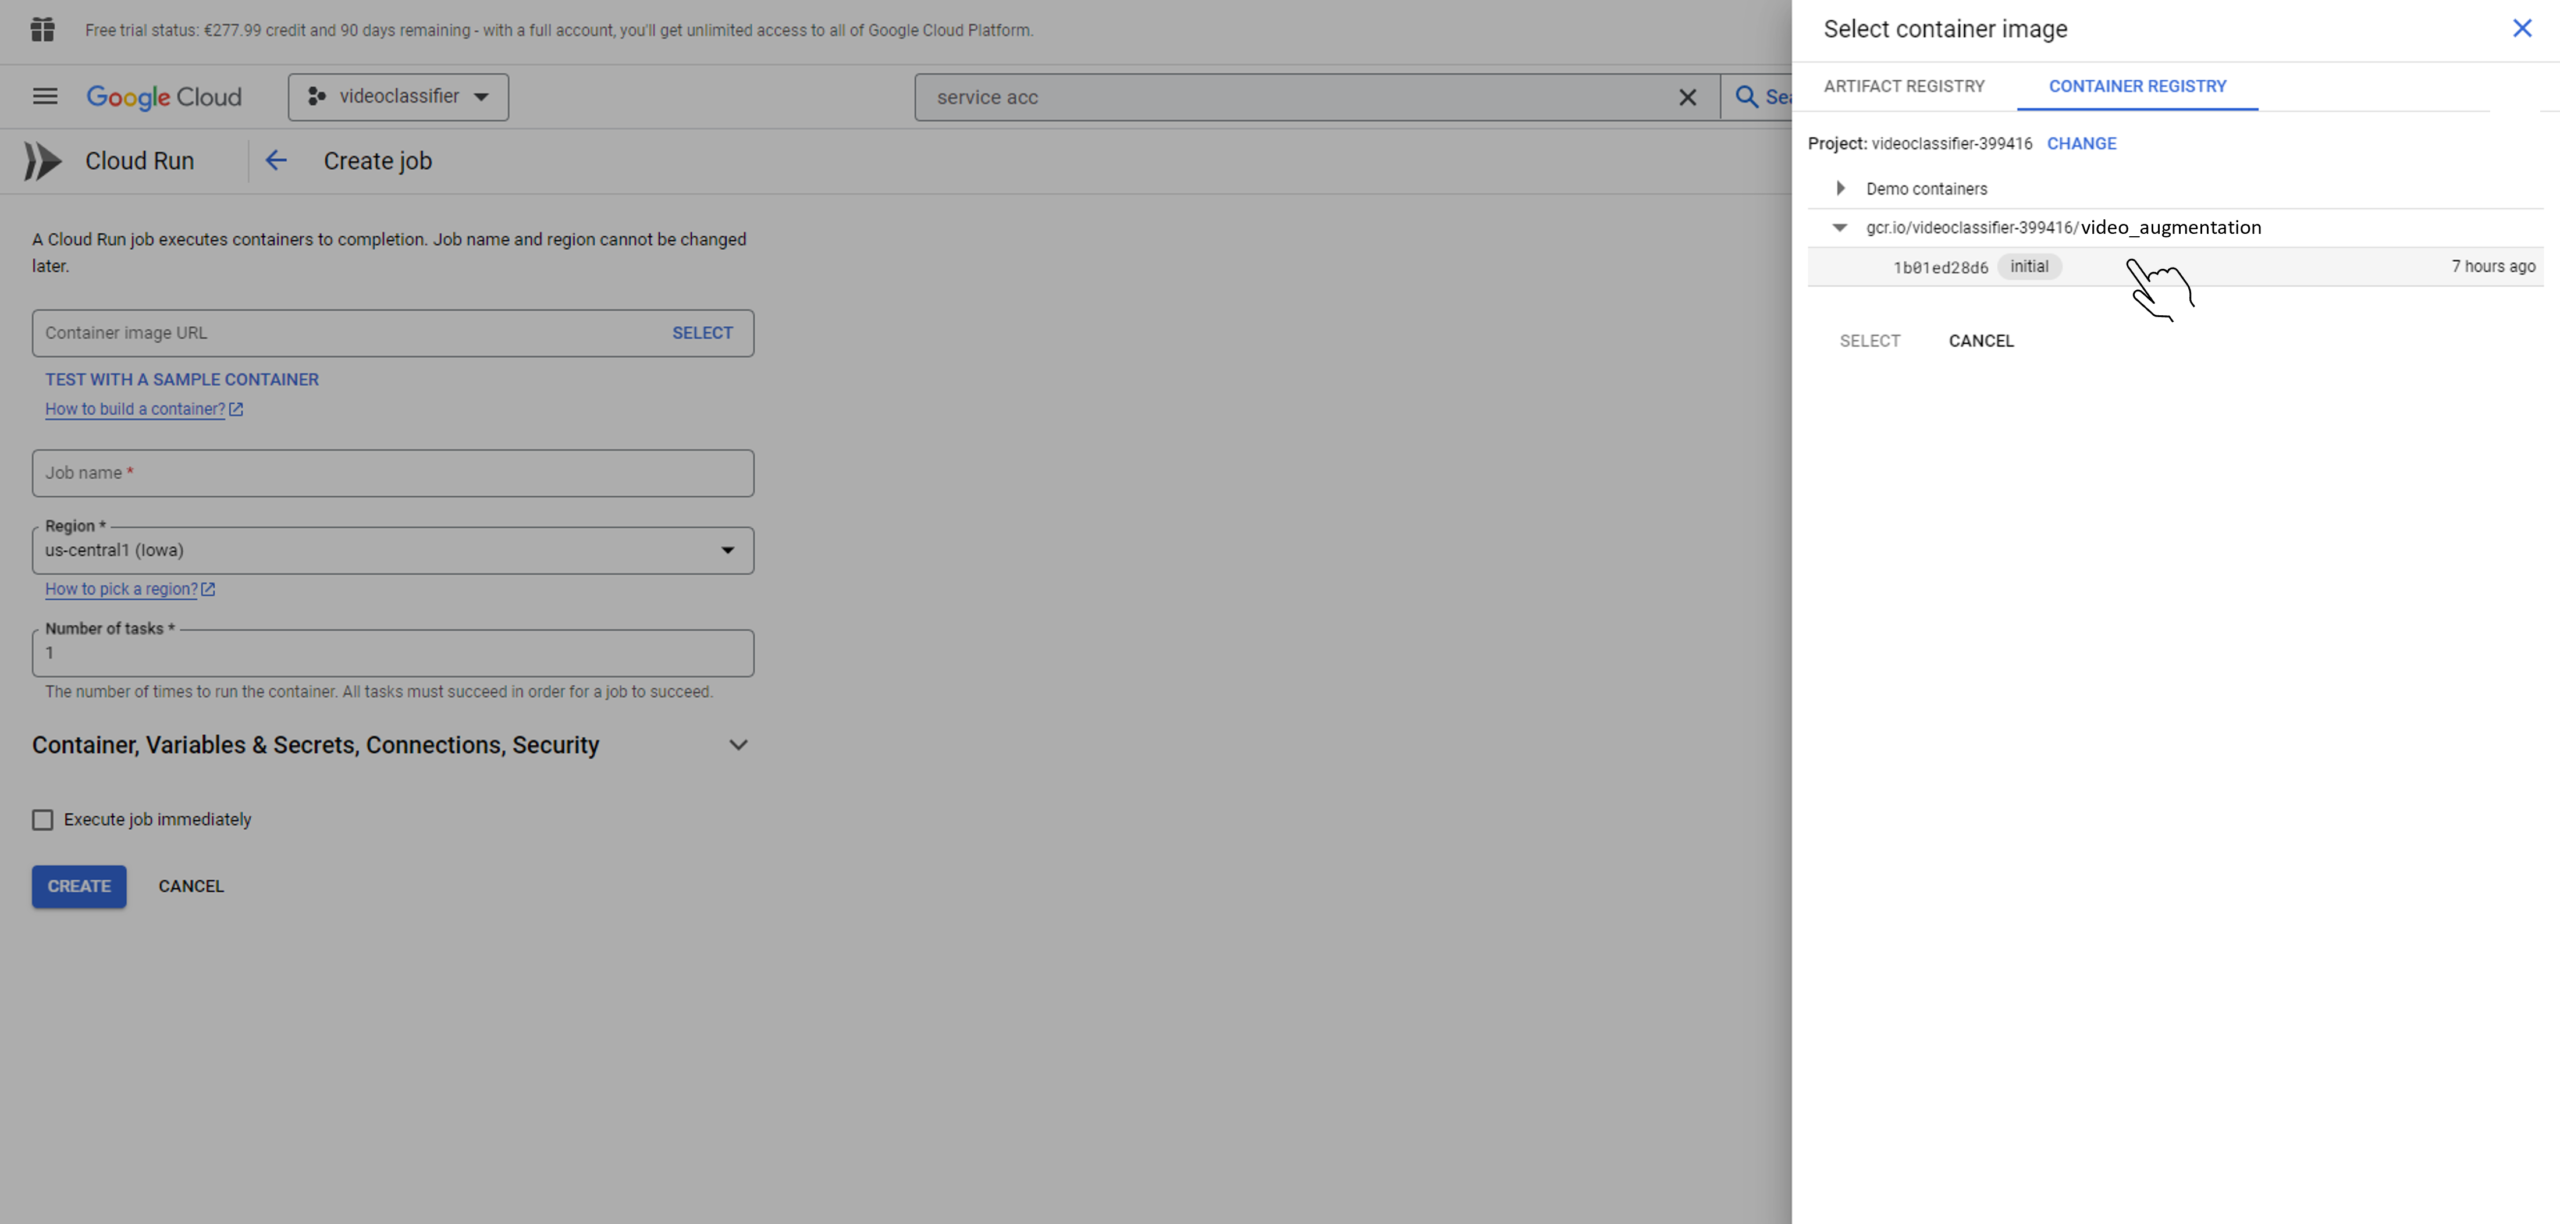
- Assign it a Job name, e.g. video_augmentation
- Choose a Region. In our case we want to stay in the EU to comply with GDPR, and we choose a Tier 1 pricing location in Spain: europe-southwest1 (Madrid)
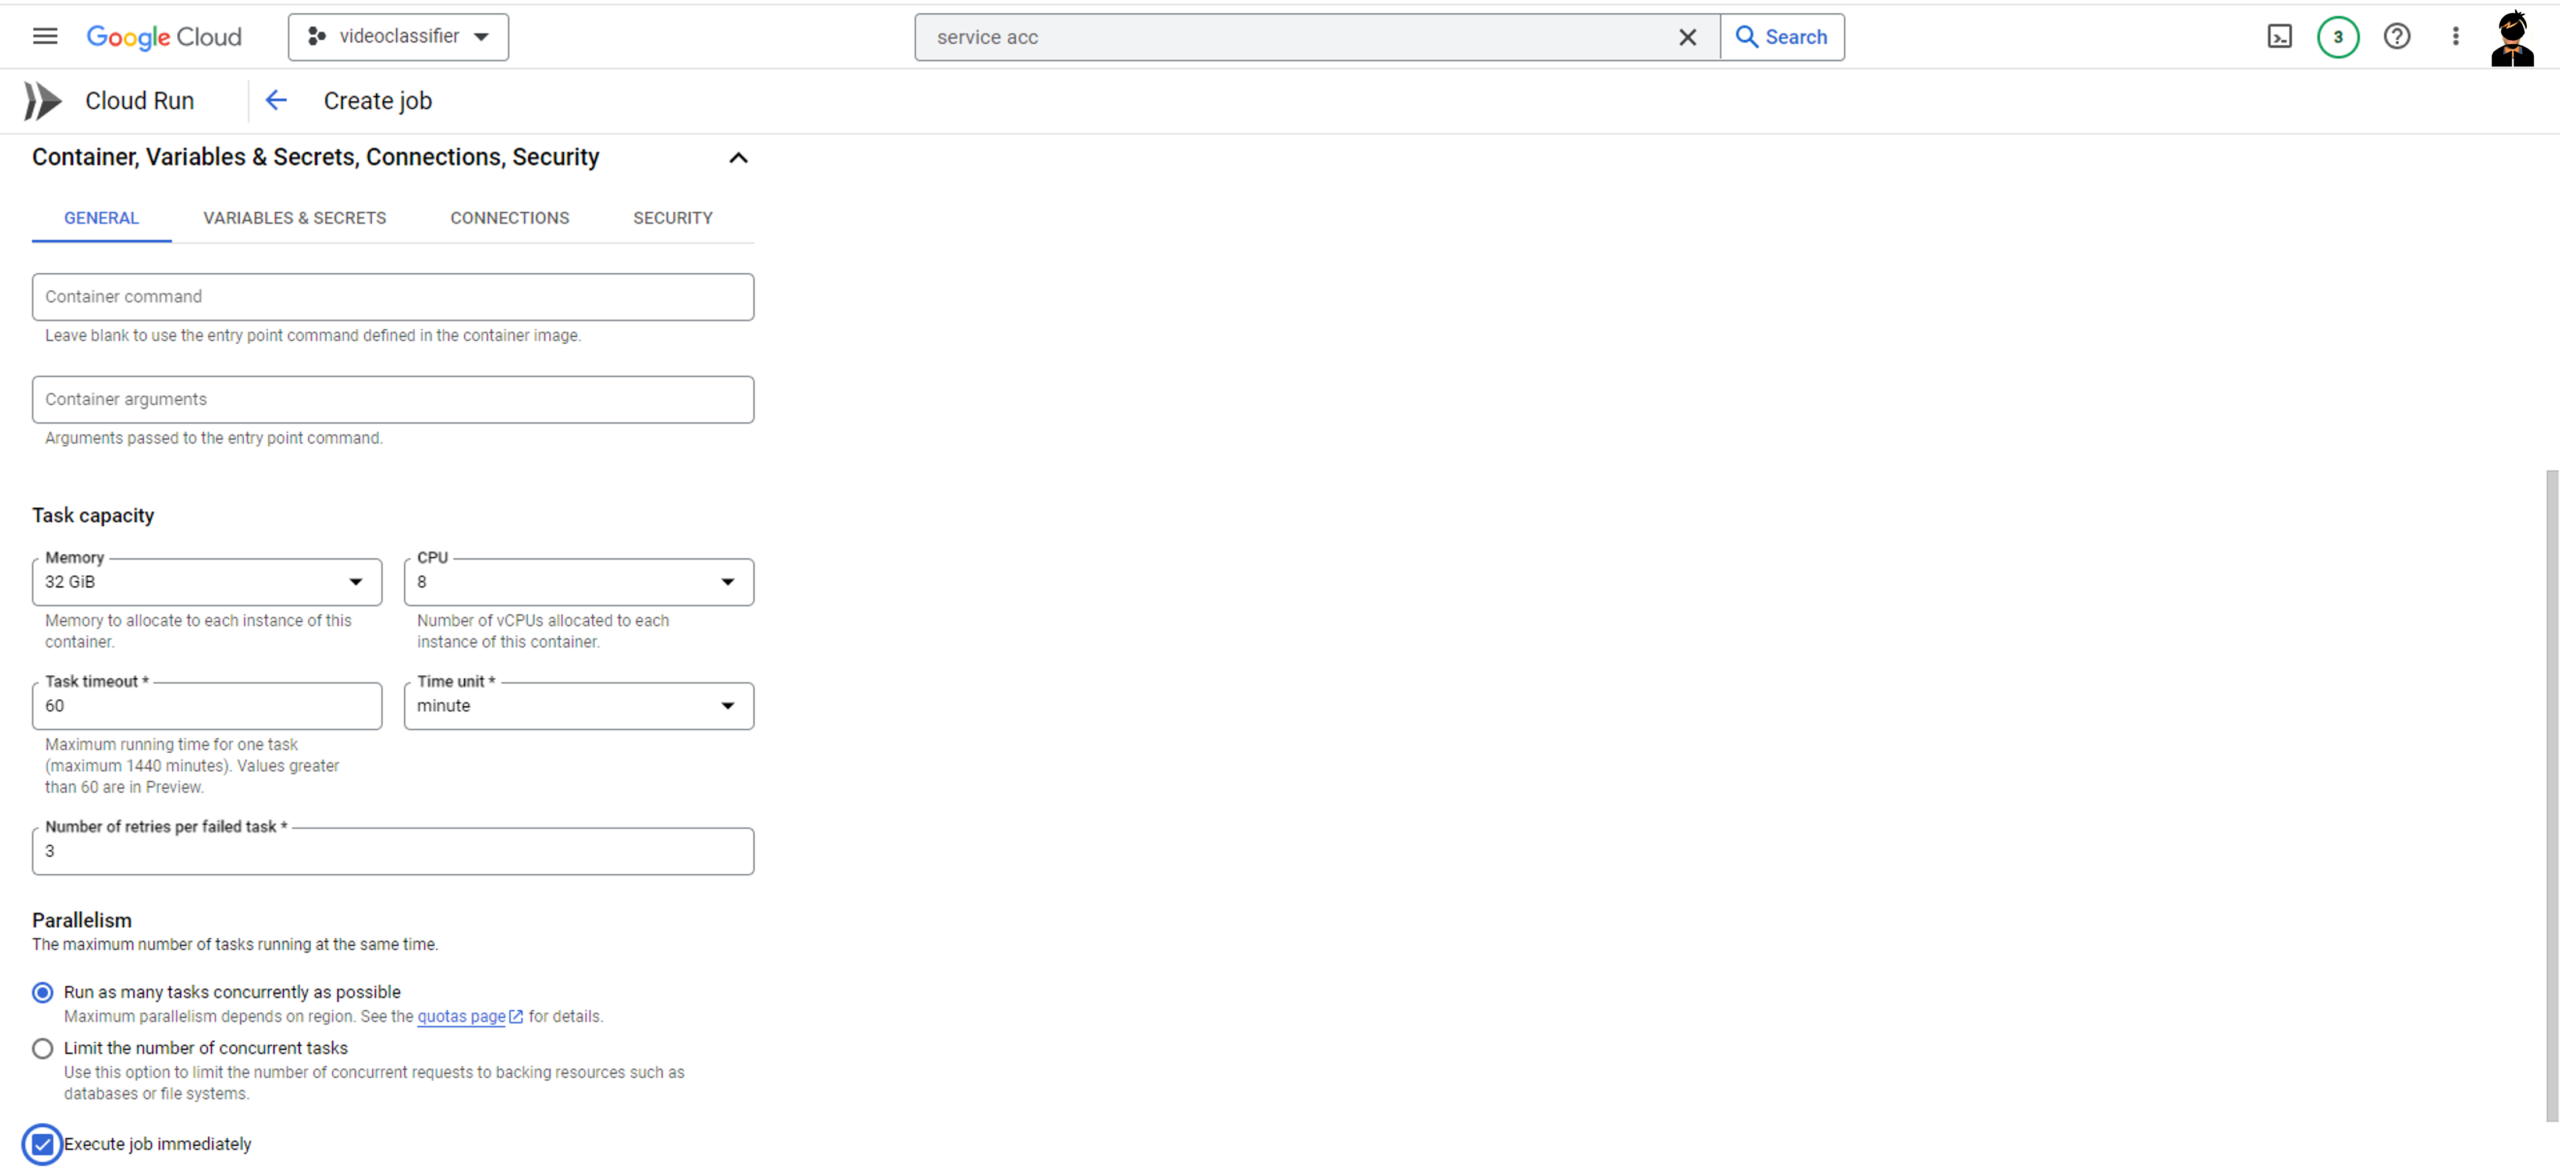
- Don’t click “CREATE” yet! We are running a big job as I said, so expand “Container, Variables & Secrets, Connections, Security” and tweak task capacity:
- Memory: 32GiB
- CPU: 8
- Task timeout: 60
- Click on “Execute job immediately” and “CREATE”!
As a result, you will now see the status of your job in the “JOBS” tab. Once the service is deployed, you’ll receive a URL where your Cloud Run service is accessible over HTTPS. You can use this URL to access your application.

That’s all folks!
So that was our brief tutorial on running containers on the cloud. You can certainly run all the steps from the command line if that is your preference, but we like using the console for steps where some customization is possible, as it is more intuitive to find the configuration options that way. I hope this was useful. I know it will be useful to future me! As always, your feedback is welcome.
About Rosan International
ROSAN is a technology company specialized in the development of Data Science and Artificial Intelligence solutions with the aim of solving the most challenging global projects. Contact us to discover how we can help you gain valuable insights from your data and optimize your processes.